It's really a simple project, and I hope you take the time to make one!

Materials
- 16x20 canvas for painting. Or any size you want, really. :)
- 3/4 - 1 yard of white solid cotton or muslin
- 17 x 21 piece of thin, white batting (this size allows for quilting shrinkage, but is perfect at the end when you wrap your "quilt" around the canvas frame)
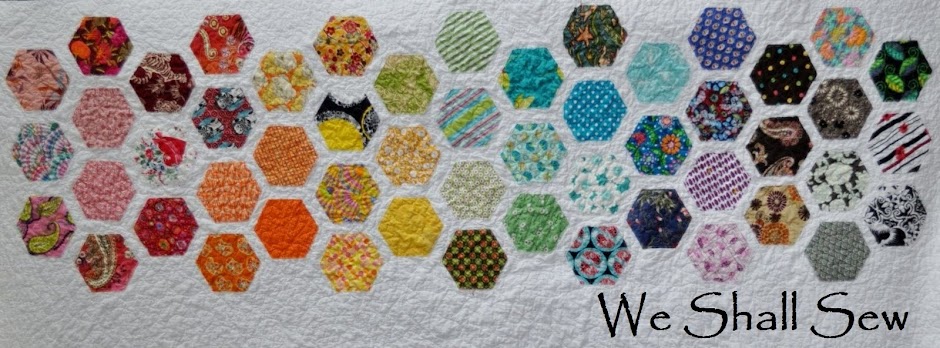
- 7 various Christmas scraps from 2x4.5" to 2x13.5"
- brown scrap for tree trunk and yellow scrap for star
- 2 yards pom-pom trim
- 1/2 yard Heat-n-Bond lite fusible webbing.
- thread, iron, hot glue gun or staple gun
Steps
- Find the size canvas frame you want to use. I used 16x20 because that's what I had. Press your scraps (mine are always kinda wrinkled!) and your muslin. Trim your muslin so that there are 3" extra muslin on either side of where the frame is. And cut it in half along the fold line (opposite the selvage), so that you have two identical pieces of muslin. Your trimmed muslin should be approximately 22x26".
2. Determine the placement of your scrap "branches", then trim them as follows:
2 x 4.5"
2 x 6"
2 x 7.5"
2 x 9"
2 x 10.5"
2 x 12"
2 x 13.5"

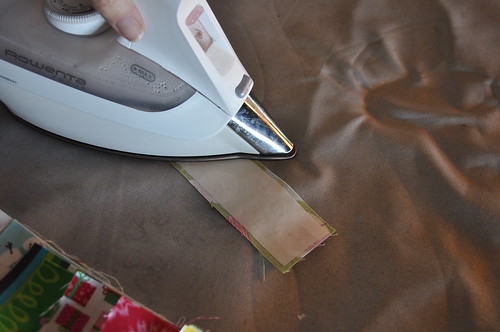
3. Fuse Heat-n-Bond Lite to the back of each strip, including the brown tree trunk and the yellow square that will become the star. Trust me on this one...you'll want to put the fusible on the square before you trim it to become a star. :)
4. If desired, pink the edges of your branches. I did this for aesthetics more than anything since this won't be washed, you don't really need to worry about fraying.
5. With a water or air-soluble pen, draw an outline on your muslin of where the wall hanging will attach to the canvas. This outline should be 16 x 20, and your muslin should be 3" larger, all around, than your outline, making it 22 x 26".

6. Lay out your "branches" again, to be sure they're in the right place, and then remove the paper backing from the fusible webbing, and fuse (iron) to one piece of the muslin.

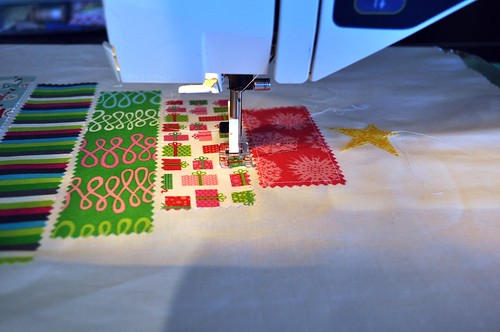
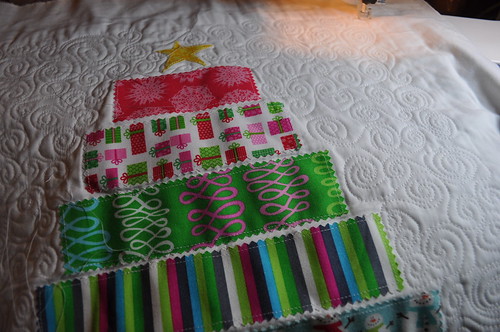
7. Raw-edge applique the branches to the muslin using a 1/8(ish)" stitch. Again, this is purely for grins. Since this won't be washed and since each branch is fused down, you don't need to worry about the branches going anywhere! I just think it adds to the finished look.
8. Make your quilt sandwich with batting (17 x 21 is much easier when it comes to wrapping it later!) and your other piece of muslin. (I am a spray baster from way back. I don't even know how to use a safety pin!) Then proceed to quilt your swirly snow. I used this tutorial from Leah Day. If you want to get away from stippling, then her blog is THE BEST place to go! Hands down.
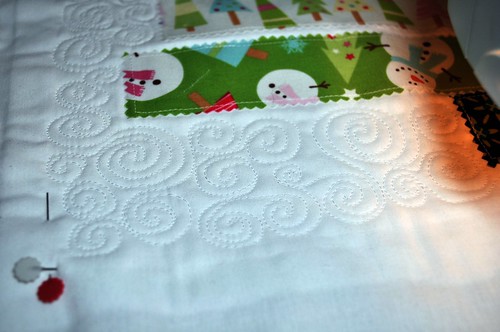
Don't look too closely at the quilting - it's far from perfect! You can see that I made some large and some small swirls, and I also tried to change direction of the swirls. I don't know if that was necessary, I just thought it would create some movement and dimension.
9. Quilt all the white, then relax your shoulders, allow your eyes to focus again, and admire your quilty goodness. :)
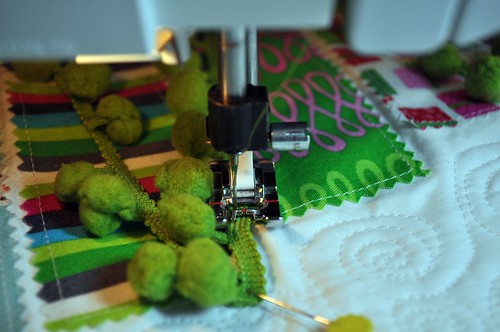
10. Commence to attaching the pom-pom trim for the garland. I found this to be the most challenging part of the entire project. You can see that I used a regular foot, but moved my needle to the left or right as necessary. A friend recommended using an invisible zipper foot, but I don't have one of those. :) This works, it's just that the trim tends to travel a bit as I'm sewing. But that's okay, garland never lays on the tree perfectly, now does it? :)
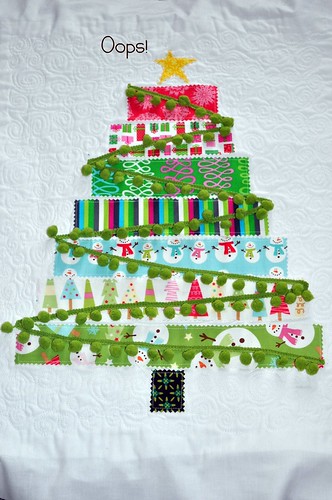
11. I decided my star looked a little lost up there, so I outlined it with yellow embroidery floss. I'm not sure how much it added, but it's just another touch. :)

12. Do a final once-over before you're ready to mount it to the canvas frame. I discovered that I hadn't quilted any snow above the star, so I put the "quilt" back into the machine and did a few more swirls.
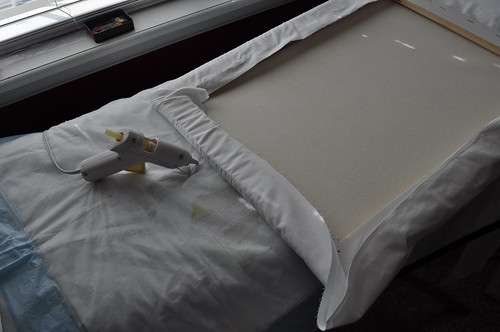
12. I placed the "quilt" on top of the frame and made sure it was centered, then I put little pins in the corners just to hold it in place while I permanently attached it to the canvas frame. I used a hot glue gun because that's what I had available, but I think I like this better than stapling it on. It's just much cleaner looking. I'll keep my eyes on it and if it seems to be pulling away from the frame, then I might follow with staples, but it's great for now!
13. Admire your hard work! And put it in a place where others can admire it, too. :)
And there you have it! How I made a 3-dimensional quilted tree wall hanging! I hope you like it, and if you have any questions about any of the steps, please don't hesitate to ask me!
*I thought of a couple of other ways to enhance this, if you're interested.
One is to drop the garland and make it into an Advent Calendar. I don't know the measurements, but it would be easy to make little pockets in each "branch" simply by making the branch 5 1/2" wide by whatever length, then folding it into almost thirds lengthwise. Then you would sew a vertical stitch every, I don't know, inch and a half or so, then do your 1/8" stitch all the way around. I my head that would make little pockets. If you try it, I hope it works! :)
Another idea is to make a trio of quilted wall hangings. You could make a tree, and a snowman, and a stocking using the same method, really. Pick your focus fabrics for the tree/stocking/snowman, fuse then raw-edge applique them onto your muslin, make your quilt sandwich, quilt your snow around, add your pom-pom/button/ric-rac embellishment, mount them on the frames, and be extra proud of yourself! :)
I'm sure there are a million ways to take this idea and make it better -- go for it!
If you decide to make one (or three!), let me know! I'd love to see how yours turns out! :)
Have a great week!
Thanks for sharing this! It looks lovely, maybe this could be my chance to finally try some stippling...
ReplyDeletethanks for this... I love it...
ReplyDeleteHugz
Gorgeous ornaments - you have such lovely taste in the materials you choose to use :-) It will be a nice Christmas tree for my baby. Happy Holidays :)
ReplyDeleteThis is beautiful! Thank you for sharing this tutorial. I love, love, love this tree.
ReplyDeleteit looks great!!!
ReplyDeletein my experience with hot glue...that is how i know.... if your piece gets hot it will loosen the glue. don't hang over a register or in direct sun. be sure to store where it won't get too hot.
I love it...maybe I can finish one before Christmas (right after my Reindeer applique)
ReplyDeleteSuch a happy little tree!
ReplyDeleteThank you so much for posting this! It's adorable!
ReplyDeleteThanks, very sweet of you to posting this beautiful christmas tree.
ReplyDeleteI vill try to make one
Super job! I love how cute it came out and how flexible the tutorial is. Trees do come in all different shapes and sizes, so why can't quilted ones? :-)
ReplyDeleteAdorable¡¡¡ Thank you very much, I'll make this Beautiful Tree ¡¡¡
ReplyDeleteMuito obrigada!!!!!!
ReplyDeleteAdorei!!!!
Necca
Es muy bonito, gracias
ReplyDeleteana-ane
It is very nice and original.
ReplyDelete